The simple (and not so simple) adventures in food and crafting

Sunday, August 25, 2013

Garlic Wine Shrimp

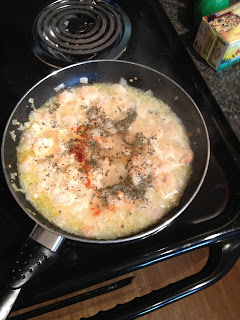
The finished product
So I decided this week that I wanted to take on a recipe that I hadn't made before. You know, one of those recipes that I had pinned on Pinterest forever ago and never made. So I had bought some fresh shrimp at the supermarket and found this recipe while scrolling though my never ending food board on Pinterest. You can find the link here to the original recipe. Now granted, I tweaked this recipe a bit because I didn't have exactly what it called for and didn't want to make another trip to the store, but it turned out pretty good.

Granted, its not the best shrimp recipe in the world (I'll have to do my favorite one in a later post) but it was a quick and easy meal, and it even got my picky eater boyfriend to try shrimp (because it had the word 'Garlic' in the title which he loves). So here's how you make it for a quick, easy dinner that's pretty yummy.

So for this recipe, you'll need shrimp, olive oil, wine, onions, garlic, chicken stock, lime juice, butter, salt, pepper, basil, paprika, parsley, and parmesan.


So to start out you need to chop up some onions. The recipe called for one medium onion, I only had small onions so I used two. It just depends on your preference of onion flavor use more if you love onions, use less if you don't.
If you're anything like me and onions make you cry uncontrollably
and makes it feel like you're eyes are burning
 try chewing a piece of gum while cutting them, it works for me
So next I took a break from the onions to work with my shrimp, you'll need about a pound of shrimp. When I went to the store, medium precooked shrimp were on sale at the fresh seafood section so that's what I got. I really like the fresh shrimp because I can get exactly how much I want. Also I like precooked because I can just throw it in the pan and don't have to worry about the cook times, all it needs is to be heated up and it still absorbs the flavors from the dish. Now this is just a personal preference but I do not like the tails on my shrimp when I put them in a dish, so I take them off in three simple steps that leave the most shrimp on the tail.

First, using a paring knife, insert it into the shrimp tail if the knife facing sideways
Second, twist the knife so that the sharp side faces down
Third, push down and pull the outside shell of the tail of with the knife
So taking the tail off the shrimp might take a couple tries, but I like it so much better than having to pick the shrimp out of my dish to eat them individually so I don't eat the tail.

So next, you take a pan and heat up a couple tablespoons of olive oil in it on medium-high heat. I have this great olive oil from a place up in Blue Ridge, Georgia that I like to use, but regular olive oil is fine also.


After the olive oil is heated up its time to add in the onions and garlic. I used garlic that was pre-minced, just because whenever I cut up garlic my hands smell like it for days afterwards and I haven't figured out a way to get rid of the smell (if anyone has suggestions about how to get garlic smell off your hands leave it in the comment section!). So if you use fresh garlic, cut it up with the onions, or if you're like me just add it into the pan. So you use about three cloves worth of garlic, if you use the pre-cut garlic it should give a ratio for how many teaspoons equal a clove of garlic. So you'll need about three cloves of garlic in with the onions.


So you let the onions and garlic cook for about a minute. Make sure that you watch it because you don't want the garlic to burn. Then you add the shrimp in.


 So you stir the shrimp in and let that cook for a couple minutes then you add in 1/2 cup of wine, 1tsp basil, 1/4tsp paprika, and 2tbsp chicken stock. Okay so here's a part where I changed some things. The original recipe called for pepper flakes and chicken base, neither of which I had or wanted to run out for, so I substituted them for paprika and chicken stock. Also the recipe calls for white wine and I had a just enough Moscato left over to use for the recipe, so I used that rather than opening up a whole new bottle of dry white wine.


So you stir that up and let it come to a boil. Then add in 3 tbsp of butter, 1 1/2 tbsp of lime juice, and salt and pepper to taste. The original recipe called for lemon juice, I only had lime, so I used lime instead of lemon. 


So you let this cook until the butter has melted and bring it back to a bubble. Then you sprinkle 2 tbsp of parsley on top and 2 tbsp of parmesan on top, mix it in and take the pan off the burner. 


Now you just mix it in with your starch of choice. The original recipe called for it to be mixed in with rice, I really like angel hair pasta, so that's what I used. 


Then you just mix it all up and it's ready to serve! It was a pretty yummy, fast, and easy dinner and I even had a little left over to heat up tomorrow for lunch!

Yummy!

Garlic Wine Shrimp
Adapted from food.com

2 tablespoons olive oil
1 medium onion or 2 small onions
3 cloves garlic
1 pound of shrimp
1/2 cup of any white wine
1 teaspoon basil
1/4 teaspoon paprika
2 tablespoons chicken stock
2 tablespoons butter
salt and pepper to taste
1 1/2 tablespoons lime/lemon juice
2 tablespoons parsley
2 tablespoons parmesan

Instructions

Heat olive oil over medium-high heat

Add garlic and onions and cook for one minute

Add in shrimp, cook for two minutes

Add wine, basil, paprika, and chicken stock, bring to a boil

Add butter, lime/lemon juice, and salt and pepper to taste

Sprinkled parsley and cheese on top and stir in

Serve over pasta

Makes about 2 servings

Sunday, August 18, 2013

Beaded Friendship Bracelet


Crochet isn't just for afghans and doilies anymore! Crocheted jewelry has become pretty popular on the internet; sites like ravelry.com and etsy.com have pages and pages of crocheted bracelets, necklaces and earrings. Some of those jewelry pieces can be pretty intricate, so I thought I would start with something sweet and simple.

Friendship Bracelets!
I started with some vintage "Bucilla Twinkle-Sheen" doily yarn that was buried beneath my craft supplies. Doily yarn or even embroidery floss works just fine for this project. Because the label on the yarn didn't specify what size hook to use, I had to experiment. I ended up using a number 3 steel hook.
The beads I used came from a good friend of mine who was sorting through her jewelry collection. This delightful bracelet had a badly broken clasp and was about to be thrown away, so I volunteered to take it home and find a good use for it.
I started by threading the beads onto the yarn. Fortunately the beads I was re-using fit the yarn pretty well. If you're buying beads, make sure they will fit around the yarn you've chosen. If you're using embroidery floss, you can always separate the strands if the beads are too small.
Pushing the beads away from the end, I set up my crochet hook as usual. I made a chain long enough to wrap around my wrist. Because my stitches were a little on the loose side, I ended up with 40 chain stitches. Chaining one extra, I turned the chain over to start on the second row with a single crochet stitch.
To add a bead, I slid one of the beads along the yarn so that it sat against the hook. Working around the bead, I made a single crochet stitch into the nearest loop.


For the pink bracelet, I crocheted a bead into every other stitch. At the end of the row, I tied off the end and trimmed the leftover yarn. There was still a tail of yarn on that end of the bracelet, so I left it there and tied a long piece of yarn to the opposite end so that I would have a way to tie the bracelet around my wrist.
Ta-da! A quick and simple project made with items that are probably lurking around your craft closet. Have fun experimenting with different stitches and different colored beads!

Beaded Friendship Bracelet

Doily yarn or embroidery floss
Number 3 steel crochet hook (or whatever size works best with your choice of yarn)
Beads

Pattern

Thread beads onto yarn, Ch 41 and turn.
SC into second loop.
Slide the first bead so that it sits against the hook. SC around the bead.
SC into next loop. SC around the second bead into the following loop.
Continue to the end.
Trim (or weave) the new end and add a piece of yarn to the opposite end for tying.


Sunday, August 11, 2013

Greek Yogurt Cheesecake


Greek Yogurt Cheesecake - SO YUMMY!
So I found this recipe on Pinterest a while ago for a "low calorie Greek Yogurt Cheesecake" and thought I'd give it a try. I tweaked a few things from the original recipe, which you can find here, but I'd have to say that this recipe was absolutely delicious and I now make it all the time (seriously I make it so much I have the recipe memorized). And this recipe is only about 75 calories per cheesecake! (depending on what toppings you use can add a little more)

So to start out, you'll need greek yogurt, sugar-free fat-free cheesecake pudding mix, butter, milk, and graham crackers.


Now here's the super fun part, you take five graham crackers, put them into a zip-lock back and smash them up real good until it's a nice and crumby. You can really use any type of graham cracker you like, I just happened to have the honey ones on hand.


Next melt 3 tablespoons of butter and mix it in with the graham cracker crumbs.


Then you line the cupcake pans with cupcake liners (the recipe makes about 12) and spoon the graham cracker butter mixture into the cupcake liners. It only takes about one big spoonful per liner, and it makes about the exact amount you need. Then you take your fingers (making sure they're clean of course) and press the graham cracker mixture into the bottom of the liner to form a crust.


Then in a small bowl, you mix 12 oz of greek yogurt, one package of sugar-free fat-free cheesecake pudding mix, and a cup of milk. Now here's one of the places where I differed from the original recipe. The original recipe called for almond milk (which I very much dislike the taste of) so I swapped it out for good old fashioned milk. Fat-free is my preference, but you really could use any type of milk you want.

So you want to stir all of those ingredients together until its nice and smooth like this:


Then you just put a nice sized dollop of the cheesecake mixture into each cupcake tin, about 1 1/2 to 2 spoonfuls per tin.


Next is the part that's fun and really you can do whatever you want. I like to add a little spoonfull of jelly on top of each of the cheesecakes to add a little bit of a fruity flavor (this time I use blackberry jelly) but you really could do whatever you want. You could leave them plain, add jelly on top, or just plain old fruit. I was even thinking about next time I make them adding some Nesquik on top of mine for a little bit of chocolaty goodness. 


Then you just pop these bad boys into the fridge for about 30 minutes and you're good to go! 


So all I have to say is that these things are absolutely delicious, and not too bad for you either. Even my dog was at my feet the entire time begging for crumbs and licking up anything that accidentally dropped to the ground.
She thought they were yummy too!

Greek Yogurt Cheesecakes
Recipe adapted from Volume 25 blog

5 graham crackers
3 tablespoons butter, melted
12 oz Greek yogurt
1 package of fat-free sugar-free cheesecake pudding mix
1 cup of milk
any kind of jam, jelly, fruit, or topping you desire

Instructions:

Line 12-cup muffin tin with cupcake liners and set aside.

Place graham crackers into zip-lock bag and smash until fine. In a small bowl, thoroughly mix the graham cracker crumbs and melted butter. Spoon mixture into muffin tins and press into bottom.

In a separate bowl, combine greek yogurt, fat-free sugar-free cheesecake pudding mix, and milk. Stir until smooth. Spoon mixture into muffin tins.

Put whatever topping you desire on cheesecakes and chill for half an hour.

Refrigerate any leftovers. Makes 12 mini cheesecakes.


<3 Becca